Spoon Carving
Looking back at my first attempts at spoon carving they look pretty poor compared to now; more spoon-shaped objects than usable spoon examples. Not that I can claim to be particularly good now, but I’ve certainly improved from when I first started; so I thought in this weeks’ blog I’d share the little things I have picked up so far in my spoon carving journey.
 |
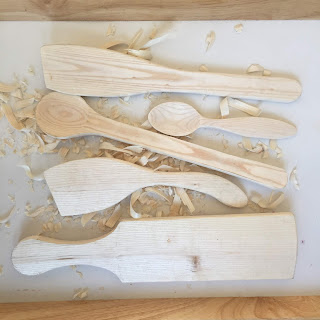
| Some of my carved utensils |
I like carving a spoon, carving has several benefits for me, firstly the practical knife control that I develop by doing the task and secondly I find it to be a very therapeutic exercise; focusing on just one task and the refinement as the spoon develops is both challenging and rewarding and helps the stresses of the day melt away.
There is something deeply satisfying with finishing a practical item and then every time you use it you remember the process of making it and that always makes me happy. Recently I’ve been thinking about how I make a spoon and my first realisation was that with hindsight my mental image of a spoon was quite different to the practicalities of a real spoon, initially I carved deep bowls in small eating spoons and wondered why they always looked odd. The reason was actually fairly obvious, most eating spoons don’t need a deep bowl, go take a look at a desert spoon now and you’ll see what I mean.
I was also only thinking about spoons in two dimensions rather than three and so once I actually looked at a spoon properly I realised they needed a side profile and I needed to keep things aligned and again, once I did that they improved.
My top tip for starting to make decent shaped spoons is to use a template, to me getting a consistent shape to my spoon has been important and starting out, you will need to make changes to the shape of your spoon and you’ll inevitably take off the lines of your outline. A template helps a lot here as you simply reapply the template and redraw the desired shape. Over time you’ll progress to the point where most of your spoon is defined before you settle on a final shape, so drawing on your outline once should be enough, but I’ve found a template helped a lot before that. The other option, of course, is just go completely free form and follow what the wood wants; there are no straight lines in nature after all. That’s going to happen to a degree anyway, it’s just that with a template you come out with something closer to what you thought you wanted when you started.
There are many different ways to carve a spoon but although the steps might differ in sequence, generally they all follow this rough outline, but my method is below:
- Select your wood and split the blank down the middle, use an axe or knife to remove the pith and flatten off the surfaces.
- Carve the side profile of the spoon. (some people do this after creating the spoon shape and can be skipped if you want a flat spoon or the blank has a natural curve)
- Mark on the shape of your spoon on the blank
- Carve away the outline of your spoon using a knife, axe or saw
- True up the sides, top and handle to be aligned with each other.
- Mark around the bowl outline a few mm where the inner bowl will come to.
- Mark on the side profile how far the bowl need to come to, this defines the thickness of the bowl rim
- Hollow out the bowl to these guidelines using your fingers to feel the depth of the bowl, take wood off the back of the bowl as well
- Carefully refine the edges of the bowl to your guidelines using small cuts
- Chamfer the edges of your design to smooth out the shape.
- Add any details or designs you might want.
At this point you need can leave your spoon to season (if its green wood) and then finish off refining it using your knife or sandpaper (depends on the finish you like). Sandpaper is a slightly controversial subject, it doesn’t leave the best finish on the spoon as the sandpaper is tearing fibres rather than slicing them, but it helps you even out your inconsistencies when your still developing your knife skills and leaves a nice smooth finish. I’ve done both (as well as used a rasp on more seasoned wood) so I take each spoon as it comes. When I started out I wanted a spoon that looked like it had been manufactured, now I like the knife finish as much as a sanded finish because each cut tells a story. Part of the enjoyment I take from spoon carving is to challenge myself to make a great looking spoon without the need for sanding, it’s something I’m still working on though.
My final tip on this is to keep your old attempts, you might feel disappointed with them now, but I’ve since gone back to my early spoons and refined them with my new skills and they have turned into much nicer examples, that I’m happy to use.
My final tip on this is to keep your old attempts, you might feel disappointed with them now, but I’ve since gone back to my early spoons and refined them with my new skills and they have turned into much nicer examples, that I’m happy to use.

Comments
Post a Comment